

WWA Shelf Pin Jig - continued
 The first thing
I noticed, after drilling only three holes, was the cramp forming
in my right thumb from holding down the locking lever on my plunge
router; it has a heavy spring you need to depress to free the
router for plunging. To lock this open for thumbless plunging,
a hex bolt was inserted in the hole for the router's edge guide
and two heavy-duty rubber bands connected the lever and bolt
to tame the lever's spring. Hopefully your router doesn't have
such a spring.
The first thing
I noticed, after drilling only three holes, was the cramp forming
in my right thumb from holding down the locking lever on my plunge
router; it has a heavy spring you need to depress to free the
router for plunging. To lock this open for thumbless plunging,
a hex bolt was inserted in the hole for the router's edge guide
and two heavy-duty rubber bands connected the lever and bolt
to tame the lever's spring. Hopefully your router doesn't have
such a spring.
Another thing I noticed was how easy it was to tip the router. Plunge routers are top heavy and a momentary loss of concentration can result in an elongated hole. This isn't such a problem on the near side of the jig where the action for holding and using the router is intuitive. But when you reach over to drill the back column of holes, the grip is awkward and tipping is much more likely - not good!
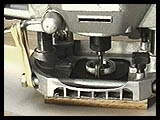
 To minimize
this possibility, a small spacer block (bottom of left photo),
the same thickness as the templates, was fashioned for mounting
to the bottom of the router. This block has a shallower dimple
compared to those on the templates and holds onto the router
base via a single brass pin. The pin fits into one of two holes
on either side of the bushing mounting plate. The dimple in the
block hugs the side of the guide bushing and keeps the block
from rotating around the pin.
To minimize
this possibility, a small spacer block (bottom of left photo),
the same thickness as the templates, was fashioned for mounting
to the bottom of the router. This block has a shallower dimple
compared to those on the templates and holds onto the router
base via a single brass pin. The pin fits into one of two holes
on either side of the bushing mounting plate. The dimple in the
block hugs the side of the guide bushing and keeps the block
from rotating around the pin.
 The holes
for the pin actually came pre-drilled with my mounting plate.
Evidently it's used for some application but I haven't a clue.
Fortunately there is one on each side and they were nicely spaced
for holding the pin.
The holes
for the pin actually came pre-drilled with my mounting plate.
Evidently it's used for some application but I haven't a clue.
Fortunately there is one on each side and they were nicely spaced
for holding the pin.
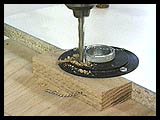
The hole was 3/16 and I reamed it to 1/4", simultaneously drilling the hole for holding the brass pin. In this setup, a 1" hole was drilled near the edge of a piece of scrap. With guide bushing set in this hole, the mounting plate is screwed to the edge of the scrap for safety in drilling - don't want it getting away from us...:)
Clamp the whole thing down to the drill press table, shove the spacer block against the bushing and then drill. To get the brass pin to stay in the block, the inserted section was dimpled with a punch and then glued with 5-minute epoxy.
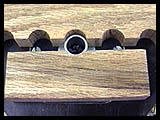
![]() One more thing
- this block is sized to 1 17/32" wide, the same width as
the setback of the fixed template from the panel edge. In this
view of the block, it doubles as the locating spacer for the
other end of the jig. In use, set the block flush with the panel
edge (melamine), bring the free end of the jig up to the block
and then clamp down.
One more thing
- this block is sized to 1 17/32" wide, the same width as
the setback of the fixed template from the panel edge. In this
view of the block, it doubles as the locating spacer for the
other end of the jig. In use, set the block flush with the panel
edge (melamine), bring the free end of the jig up to the block
and then clamp down.
The picture at left shows the brass pin. This isn't a very good photo but the pin is slotted down the middle with a hacksaw. To get the pin to stay in the router base when the router is turned upside down, I flared the halves of the pin outward slightly, inserted a thin wedge (1/16" drill bit) in the bottom of the saw cut, and then bent the halves back in. This caused the pin to swell outward and then in.
It might take a few tries to get the exact amount of flaring. Once you have it, the block should snap in and out of either hole in the mounting plate using only one hand.
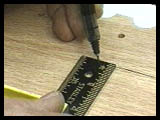 The last thing
I needed to do was draw an ink line along each of the templates.
When experimenting with the jig, I noticed sometimes, if I was
going too fast, it was possible to think your bushing is properly
set in a dimple but it's really against the flat spots of the
template.
The last thing
I needed to do was draw an ink line along each of the templates.
When experimenting with the jig, I noticed sometimes, if I was
going too fast, it was possible to think your bushing is properly
set in a dimple but it's really against the flat spots of the
template.
To prevent this confusion I drew two lines, one on each template, to tell me if the router is nestled in the dimple properly. Each line is set to the deepest reach of the router base and it's what you watch when drilling. I'd give you some numbers for this line but all bases aren't the same and mine was different from one side of the base to the other.
The Drill
Now that you have your jig built, it's time to learn how to use
it. Though many can figure it out for themselves, here is the
step-by step. We can't have you owning any tools without an instruction
manual...:) If you already have a shelf pin drilling jig, these
instructions will sound familiar.
#1) Prepare your stock. The sides of your bookcases or cabinets should have square ends. Lay the part on your bench or other work surface with hole side up.
#2) Lay the jig on your workpiece. Butt the end of one of the rails (I always use the left one) to the bottom of the workpiece, align it to the edge with the end of the rail and spacer block and then clamp down.
#3) Find your beginning and end holes. Place the router, equipped with spacer block and guide bushing, into the last hole and set a shelf pin as an end stop. Drill the holes for the near side, watching the ink line to make sure you're in the dimple all the way for each hole. When the first column is finished, turn off the router.
Before you go on to drill the holes along the adjustable template, remember one thing - do not turn your router around! It's highly unlikely your drill or router bit is centered exactly in the guide bushing. To avoid having one column of holes slightly higher than the other, keep the same router handle facing the same end of the jig for both columns of holes.
#4) After your router has spun down, remove the spacer block and mount it to the other side of the router base. If your work bench is narrow, work from the other side. If not, reach over the jig with the router and go slower - reaching over is much less intuitive and here is where you will likely make most of your mistakes. When finished, unclamp the jig and start over with a new panel.
Pacing Yourself
As you may have noticed, many of the little nit-picking things
we've done to this process have been designed to remove any impediments
to speed. You don't have to lift the router or drill, you don't
have to worry about drilling square and you don't have to stop
the tool for anything once you start a column of holes. The motion
is plunge and slide, plunge and slide - very fast!
How fast? After experimenting a bit and getting a feel for the method, I was able to drill one column of sixty holes in under a minute on the near side of the jig. That's right - one hole per second! The process was un-nerving and one of the holes was a bit un-acceptable (just a bit...:) but it's indicative of what a younger, more determined person could do who didn't possess 44 year-old reflexes. :(
For the rest of us, a brisk pace is two seconds per hole and a leisurely gait would take three to four seconds after you get some experience. Plan on cycling a whole panel through the process of clamping and unclamping every six to ten minutes with 750 - 1000 holes drilled in tall bookcase parts in an hour. If it takes you a day to build the jig, that investment could be entirely paid off with your first large cabinet project.
One more thing before you build this
jig. Someday it might be obsolete. During it's development, an
idea for a better jig came along. It holds the promise of being
faster and less prone to operator error even if it is more difficult
to make. I don't know when I'll build it - the current one sort
of shot my free time for a while and works great. In the meantime,
if you need to drill a ton of holes, this one is still the fastest
jig on the planet.
Not a bad deal, huh? :)
Jim Mattson
PS. If you build this jig, let me know how you like it and if you made any improvements. Since this is a web page, it can be updated and improved too! My email is: jmattson@intrepid.net
Also, if you would like to follow the back and forth of our discussions at the Info Exchange, here are some links. If for some reason a link doesn't work, the topic has been archived. Please let us know if this happens - thanks!
Original Posting
Second
Discussion
Third
Discussion
Update - August 14, 1999
The article has been in place
for four months now and we have our first significant improvement
suggested by a visitor. Kurt Petersen of Perterson Concepts (khpeter@onr.com)
suggested a completely different orientation for the templates
after ripping them in half on the table saw. Instead of swapping
them side for side, he suggested just flipping one over, putting
the template dimples facing the same side of the jig.
Of Course! (or as the kids say, 'duh!'...;)
This new orientation provides two improvements. First, you don't have to mess around moving the anti-tip block from one side of the router to the other between doing both rows of holes. The pin doesn't have to flair exactly and you could even screw the block onto the base of the router and forget about it.
Second, you're using the same technique to move the router along both sides of the jig - no pushing one side and pulling the other and much less tendency for mishap. In fact, this orientation should shave a whole minute off doing two long rows of holes - very nice!
You will have to make sure you drill your holes square and one side of the template will hang over the edge of the workpiece, but these are non-issues compared to the improvements in speed and ease of mobility. Next chance I get I'm re-working the jig. Thanks Kurt!