

Cutting Box Joints. A New Easier Method
by Lorne N. Gushulak
It took me a while but I now have a couple
of pictures for you showing the setup required for the tablesaw
and the router to cut the box joints..
Almost all the woodworkers I talk to admire the finger or box joint. But it is a different story when you ask them how often they use the joint.
" Too much time involved." "Boring repetition."
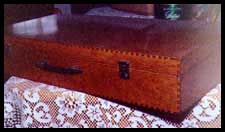
I once made a wooden briefcase for my
son to hold his hockey card collection. I used 1/4" Birch
plywood and made the finger joint on all edge joints. It came
out quite well. Of course that was when my back was in much better
shape. And the others are right, it got to be very boring sliding
the panel over the locating pin, cut, lift, back up and cut again.
So I got to thinking there must be a better way and came up with what I think is an efficient and quick way to cut multiple joints and save time.
You need a tablesaw and a sawblade which cuts a 1/8" kerf. Fortunately, most ten inch saw blades will cut 1/8". You also need some 1/4" and 1/8" plywood. This must be a full 1/4" and a full 1/8", nothing else will do. The plywood is cut into pieces approximately 2"x 12" and you need about 10 of the 1/4" pieces and one 1/8" piece to start with which I call the Stack. You also need a length of 2"x2" which will fit across your sawtable, parallel to your regular fence. This needs to be clamped down to the sawtable. This next method will cut 1/8" joints because you are using a 1/8" sawblade. If you decide to use a 1/4" dado blade then you will need 1/2" and one 1/4" pieces of plywood for the Stack. If you decide to do these on the router table the same dimensions apply, for 1/8" and 1/4" router bits.
 Let's
assume we are making three finger joint boxes, 3"x10"x12"
out of 1/2" stock. The bottom is assumed to be glued or
nailed on later. The box will have joints on just the sides and
backs and fronts. Cut the six pieces for the sides and the six
that will comprise the fronts and backs. Gather the sides together
as one Block, 3"x3"x10" and clamp the block
across the middle section. I lay the pieces long edge up on the
table and edge to be cut up against the fence on the tablesaw.
This makes it easier to square up the Block. I use a "C"
clamp and tape the handle in the middle so it doesn't slide around
and get in the way. I first tried one of those real nice one-handed
slide clamps, but I was concerned I might accidentally bump the
release trigger and dump the works into a whirring sawblade so
I changed to the "C" clamp. Measure the center of the
Block on the area to be cut. Be accurate here, it makes a difference
when you start cutting the fronts and backs. Line up the center
mark on your sawblade and slide your fence over to the Block
so that when you pass the Block through the blade it will cut
equally on each side of the line at center. Set up your sawblade
for a cut in height of 1/2" or slightly more. It doesn't
hurt to leave the fingers a little long and then sand down. Most
sawblades leave a small rise in the center of the kerf so don't
be afraid to go long.
Let's
assume we are making three finger joint boxes, 3"x10"x12"
out of 1/2" stock. The bottom is assumed to be glued or
nailed on later. The box will have joints on just the sides and
backs and fronts. Cut the six pieces for the sides and the six
that will comprise the fronts and backs. Gather the sides together
as one Block, 3"x3"x10" and clamp the block
across the middle section. I lay the pieces long edge up on the
table and edge to be cut up against the fence on the tablesaw.
This makes it easier to square up the Block. I use a "C"
clamp and tape the handle in the middle so it doesn't slide around
and get in the way. I first tried one of those real nice one-handed
slide clamps, but I was concerned I might accidentally bump the
release trigger and dump the works into a whirring sawblade so
I changed to the "C" clamp. Measure the center of the
Block on the area to be cut. Be accurate here, it makes a difference
when you start cutting the fronts and backs. Line up the center
mark on your sawblade and slide your fence over to the Block
so that when you pass the Block through the blade it will cut
equally on each side of the line at center. Set up your sawblade
for a cut in height of 1/2" or slightly more. It doesn't
hurt to leave the fingers a little long and then sand down. Most
sawblades leave a small rise in the center of the kerf so don't
be afraid to go long.
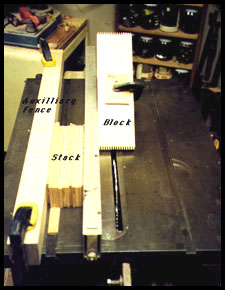
Now take the 2"x2" fence and lay it parallel to your adjustable fence. In between the two and in an area about on a plane with the saw arbor lay the Stack of cut plywood, edge sides up, lengths parallel to the fence, EXCEPT for the 1/8" piece. Leave this piece out for now. Slide the 2"x2" fence over and snug up to the Stack so the whole fence, Stack, fence, forms a tight sandwich. Clamp the fixed fence securely, if this one moves even a fraction the cuts will not intermesh properly. Be careful that the handles of the clamps on the fixed fence do not interfere with the "C" clamp on your Block as it passes through the blade.
Take up the Block and checking one last time that it is going to cut down the center line, start the saw and cut the first pass. Now Flip the Block 180 degrees, that is , turn it about the vertical axis until you are looking at the first cut you made and pass the Block through the blade making a center cut on the opposite end of the Block. This maneuver determines the placement of the "C" clamp at the middle section. Stop the saw, release your adjustable fence and remove one of the 1/4" pieces of plywood in the Stack. Replace the Stack and push your fence over so that it once again makes a tight sandwich with the fence, Stack, fence. Start the saw and run the Block through the blade but this time before you Flip the Block, first Turn the Block through 180 degrees horizontally and make another cut on the opposite side of the cut just made. Now Flip the Block, cut, Turn and cut again. Four quick cuts in six pieces of wood. Now you can see how this should save a whole lot of time cutting finger joints. Make certain that when you are cutting there is no sawdust between the Block and the fence and also when you are shifting the Stack that no sawdust gets between the pieces. Continue the cut, Turn, cut, Flip, cut, Turn, reset Stack, until you reach the outside edge of the Block.
The next step involves making a Block of the six pieces that comprise the fronts and sides of the box you are making. Again lay the pieces edge up against the fence and square to it and clamp the center. Replace all the pieces you took out of the Stack and check that the blade is on the center line of the Block. Now, remove one of the pieces of 1/4" plywood from the Stack and in its place put the 1/8" piece of plywood. Get everything tight and check that the blade is now cutting to one side of the center line. It's a good idea to have a center line on each side so that you can place the Block at the head and tail of the blade and see that there will an even slice taken on each side of center. Run the Block through, Turn, cut, Flip, cut, Turn, cut and then stop the saw and take out one of the 1/4" plywoods as was done before. Continue this process until you get to the outside edge and you can cut no more. If done with care the pieces should go together tightly and there's your box. Because you start in the middle the outside last cuts even out pretty nicely.
If you find you are having problems it could be that you are not getting an even pressure on your sandwich. Be careful that a piece of the Stack does not get caught up in the mitre gauge slot. Use the best 1/4" plywood you can find. You may need to put stabilizers on your blade if the cuts look jagged and you must hold tight to the fence passing through the blade.
There is one drawback to this method and you may have already guessed it. The "C" clamp must be able to clear your fence at both times when cutting. So if your fence is 3" high the material must be 8" or longer. There is a fix for this but it does involve a little more fussing about. Instead of across the middle the "C" clamp could be placed over one end of say a 4" long piece. This means you must only cut and turn on one end, but since you are cutting 6 pieces instead of one you are still saving quite a bit of time. When you've finished one end of the 4" piece clamp the opposite end, restack and cut the other end.
This method really works well when the Block is about square or if rectangular then longer than the width of your material.
You can use this method with a 1/4" Dado setup and 1/4" and 1/2" plywood pieces. If you find that the pieces go together too tightly and want a looser fit then add a small shim to the dado setup which will bring it a thou or two over the 1/4".
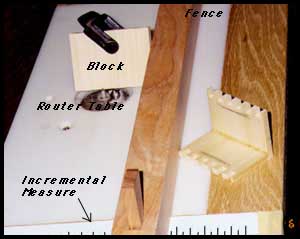 To
use the router table involves much the same setup except that
I used one of those incremental tape measures instead of the
Stack. I set up my Block and centered it at the router bit (1/4").
Then I brought the fence over to the Block and locked it in place.
Then I slipped the measure under the fence, taped it down and
lined it up at the edge of one of the segments with a long mark.
Long marks are 1/2" apart and differentiate side pieces
from backs and fronts in cutting. The backs and fronts have a
similar 1/2" spacing but use the shorter markings. Cut down
the center of your Block, Flip, cut the other end, then move
the fence to the next mark and continue the sequence of cuts
as outlined above.
To
use the router table involves much the same setup except that
I used one of those incremental tape measures instead of the
Stack. I set up my Block and centered it at the router bit (1/4").
Then I brought the fence over to the Block and locked it in place.
Then I slipped the measure under the fence, taped it down and
lined it up at the edge of one of the segments with a long mark.
Long marks are 1/2" apart and differentiate side pieces
from backs and fronts in cutting. The backs and fronts have a
similar 1/2" spacing but use the shorter markings. Cut down
the center of your Block, Flip, cut the other end, then move
the fence to the next mark and continue the sequence of cuts
as outlined above.
The secret of this method is that you
start the cutting in the middle of the Block. This ensures that
the ends come out the same at the same distances. It also insures
that the sides and fronts will mate properly and you don't need
to plane off any to get a flat surface.
I hope this works for you and the next time you think of cutting
finger or box joints, try the Gushulak method.
Cheers.
:{) Lorne
E-Mail: I would very much like to hear your comments
lngush@shaw.ca
Addenda:
Some people have asked where you can get 1/8 and 1/4 inch plywood today. It is getting scarce isn't it? One idea is to use solid stock which you can produce yourself on your planer or buy from almost any good lumber store. If you are one of those fortunate enough to own one of those Jigs that use incremental tape measures to space their cuts or similar then you don't even need the Stack. You can just dial in the increments that you need on your jig.
© Lorne N. Gushulak 1997,98,99